In this blog post, I will talk about how about to record a research talk on a computer as a video. This is an important topic for researchers for at least two reasons. First, sharing videos talking about your research can help to promote your research. Second, a researcher may be invited to send a video of his talk to a conference if he cannot attend it because of issues such as not obtaining a travel visa. Third, recording a video of a talk is useful as a backup plan when giving a talk online.
The steps to record a presentation as video on a computer are as follows.
Step 1. What kind of presentation do you want to give?
The first step is to decide on the type of presentation that you want to record. The most common types are:
- A) Slides with voice-over: A person will record some slides with a voice-over.
- B) Video of a talk: A person will record a video of himself talking without slides.
- C) Complex presentation: A person will combine multiple elements such as a presentation with slides, a video of himself, and audio.
- D) Virtual whiteboard presentation: A person will do a type of presentation where we will see him writing or drawing live on a virtual whiteboard.
Doing a presentation of type A) or B) is easier than of type C) and D). But a more complex presentation may sometimes appear more interesting.
Step 2. Make sure that you have the right equipment
Recording a presentation can be done using very basic equipment like a cellphone or the microphone and webcam of a laptop computer. However, the quality of built-in webcams and microphones if often poor. To record video presentations, I use:
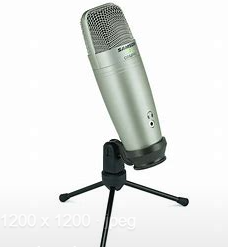
A professional microphone. I have bought one that is not so expensive and can be plugged by USB, and comes with a tripod (the SAMSON C01UPRO – see below). Using such microphone makes a huge difference in sound quality compared to the built-in microphone of my laptop. Some people will also buy additional accessories for their microphone like a pop filter, and a microphone shock mount. Also, it is important to plug the microphone directly into a USB port of the computer rather than using a USB hub to avoid recording delays.
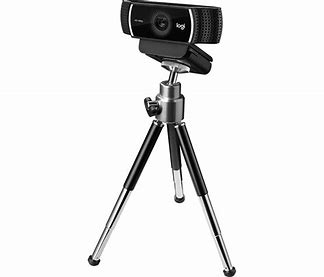
A good webcam. I have also bought a good webcam (Logitech c922 Pro Stream), which can record in high definition with good colors. A nice feature is that the webcam can also be mounted on a tripod and that it has a free background removal feature that I will talk more about later.
Light. A good lighting source is also important if you are going to record videos of yourself using a camera and want to look good. Some cheap LED lamps or LED panels can for example be purchased and installed on your desk.
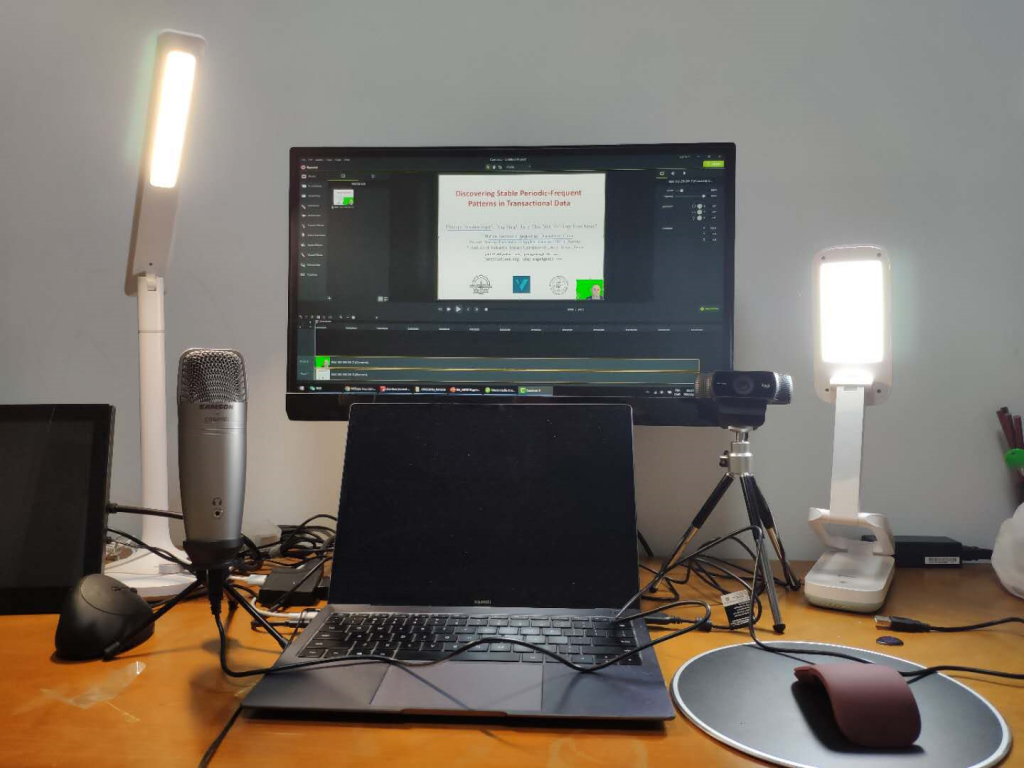
The above is perhaps the most important piece of equipments to increase the quality of recorded talks. Other equipment could also be added like tripods, a green screen for shooting videos, good headphones, etc. Here is a picture of my relatively simple setup for recording videos. I use two LED lamps, and an external webcam and microphone.
Step 3. Prepare your presentation
Before recording a talk, it is recommended to prepare your talk well and rehearse it a few times. This is true for any talks so I will not talk about this here.
Step 4. Record the video
Depending on the type of presentation that you will make, it will be more or less complicated to record the presentation. I will discuss a few cases below.
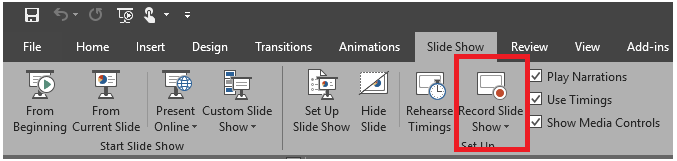
For a presentation of type A) (slides + voice-over), it is quite simple. One can prepare his slides with a software such as Microsoft Powerpoint and then use the “Record slide show” feature to add voice to the presentation. This is done by clicking on the button below:
The result is a Powerpoint presentation that can be played with audio on any computer equipped with Powerpoint. Then, for more convenience, there is some software to convert a Powerpoint presentation to a video.
For a presentation of type B) (video from a camera), one can use some basic software to record from a camera such as a wecam. Some basic software to record a video come packaged with most operating systems (e.g. the Camera app in Windows 10). However, there also exist many other software programs that let you record videos but also add special effects, transitions, texts and other elements to your videos. Some video editing software are quite powerful and easy to use (e.g. Wondershare Filmora, Movavi Video editor) while some are harder to learn but are more powerful (e.g. Adobe Premiere).
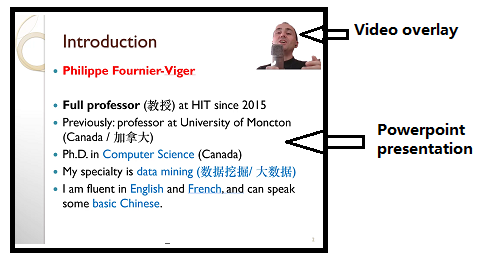
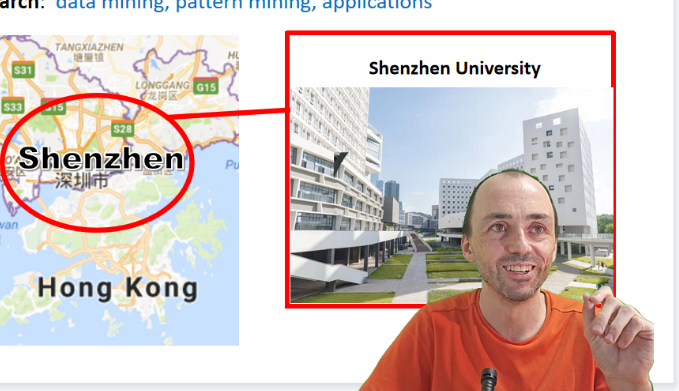
For a presentation of type C) (slide + video of the person), it is more complicated to record because it requires to not only record your slides but also a video of yourself at the same time and then put them together in a video. Here is a picture of the result that we may want to achieve:
To do such video recording, I use the Camtasia software, which allows to record my screen or a Powerpoint presentation with a Webcam at the same time, and then to edit the resulting video with effects, transitions, text, etc. This software is not free, but it is very easy to use and powerful. Other alternative software could certainly be used.
I first open my slides with Microsoft Powerpoint.
Then I open the “Camtasia Recorder“. You can see the interface, below:
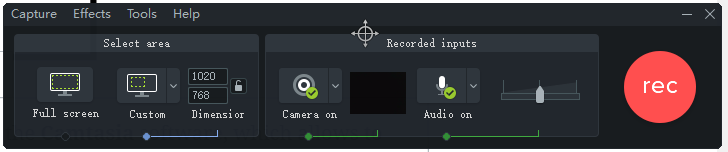
There, I first select the part of the screen that I want to record by clicking the “Custom” button. Then, I choose to record using my webcam by clicking “Camera on” and using my microphone by clicking “Audio on“. Then, to start recording, I click the “rec” button.
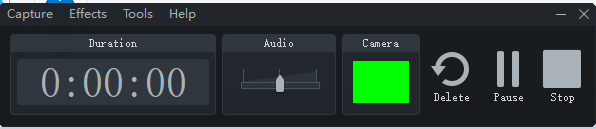
Then, after I finish recording my presentation, I click “Stop“.
After clicking “Stop” this opens the Camtasia editor and there I can edit the video that I have recorded. The interface of the Camtasia editor looks like this:

In the editor, it is possible to cut some part of the videos, add effects, and many other things. As you can see in the picture above, I have two different video tracks (at the bottom), one for the video recorded from the webcam (with a green background), and one for the presentation.
Then, since I have shot the video of myself with a green background, I can remove the background behind me. This is done by clicking on the video track of me and adding the “Remove a color” visual effect where I choose “green” as the color to be removed. (see a screenshot below):
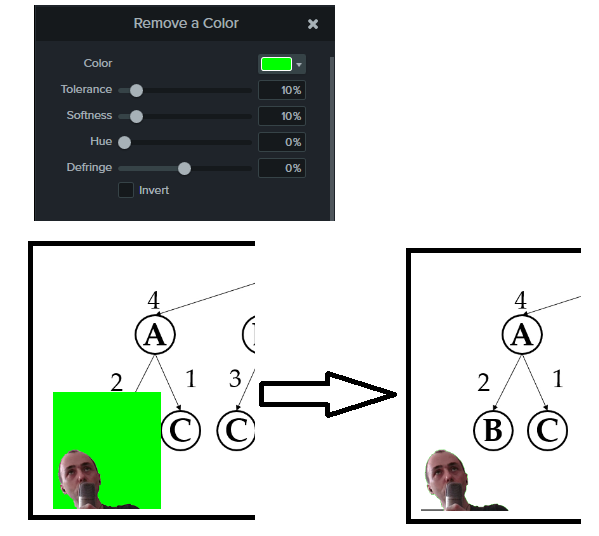
This effect called “Chroma key” is a nice effect to have to do a nice presentation. It allows to have a transparent background so that I can overlay my video on top of my slides! If you also want to do this, you first need to shoot your video of yourself with a green background. There are two ways to do this. The traditional way is to shoot with a green screen behind you like this (source of the picture: Amazon).

However, buying a green screen is actually not necessary. A more simple solution is to use a virtual webcam software like ChromaCam that will use machine learning to automatically remove your background and put a green background behind you.
This is what I have done in the example above to avoid buying a real green screen. The latter would of course give a better effect but it would require additional space and money. The virtual webcam software Chromacam can be used for free but in that case, it will add a watermark to your videos. To remove the watermark, it is possible to buy a license. Or if you have a webcam like the C922 Pro Stream or Brio from Logitech, then ChromaCam will be free to use for the ChromaKey effect. So this is one of the reasons why I chose to buy the C922 Pro Stream for my setup. There are some other alternatives to ChromaCam like XSplit VCam but it is also not free and worse, it is based on a subscription model that requires to pay every month. There might be some other free alternatives to Chromacam but I did not find a good one that is easy to use and give good results. Here is a picture of the Chroma Key effect obtained using the Chroma Cam software:
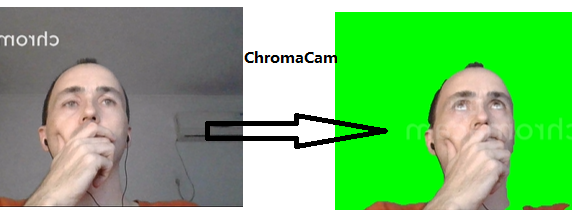
As you can see above, it can remove the background quite well, although it may cut a bit of my hair and shoulder sometimes 😉
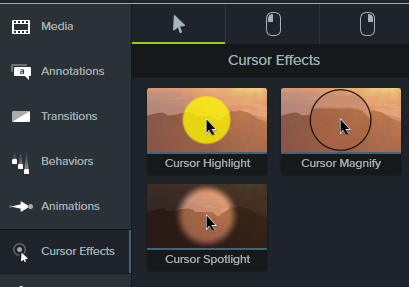
Another important thing that I do using the Camtasia Editor is to add a “Cursor effect” so that my mouse pointer is highlighted in yellow in my videos. The result looks like this:
To do that, I click on the video track of my slides in Camtasia Editor and select a Cursor effect from the one offered:
Lastly, after recording the video, the last step is to encode it in an appropriate format. I usually choose MP4 because it is read by most browsers and devices. Then I publish the video. There exists various websites for publishing videos with different features. In my case, I already pay for a hosting company to host my website. Thus, I put my videos on that platform.
Lastly, for a presentation of type D) using a virtual whiteboard for writing and drawing on the screen, one can use a pen tablet or a computer that support pen input. For example, I bought a Wacom Intuos pen tablet (see below) that I connected to my laptop. Using this tablet, I can draw inside a software like Microsoft Paint, Powerpoint or One Note.

Then, I can record what I am writing using a screen recording software like Camtasia. This allows to create video presentations where I appear to be writing on a virtual whiteboard. For example, here is a little drawing that I made using the pen tablet, just as example:

Using this type of presentations is very useful to teach topics such as mathematics that are typically taught using a whiteboard.
Update from 2023: a green screen, and better recording method
I have recently upgraded my setup to record with a green screen, and the result is quite better. As you can see in the screenshot below:
This is my updated setup with a green screen:
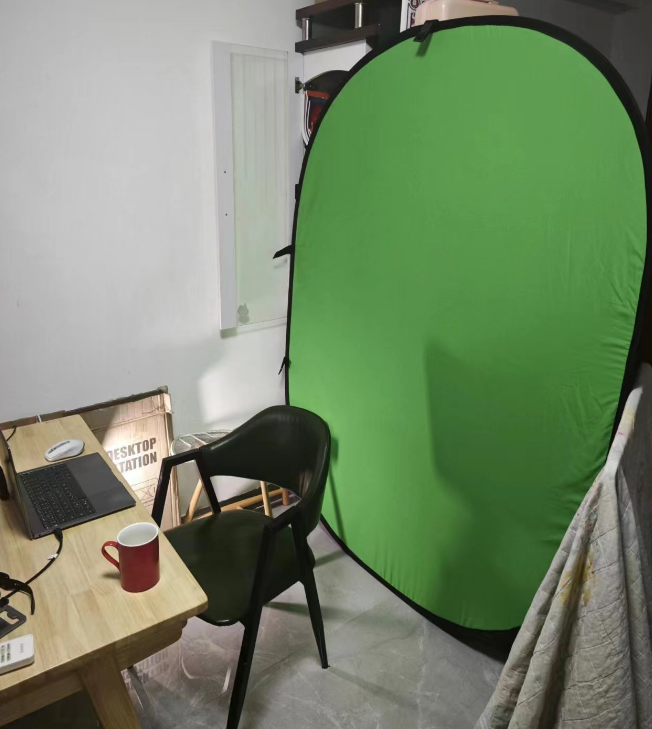
Having a green screen gives better results but requires more space and also to adjust the lightning properly which is more complex than my previous solution with ChromaCam.
Besides, I also recently improved my recording method to get better video quality. A problem that I had observed is that Camtasia is quite CPU hungry and because of this the videos that I recorded of myself with my webcam tended to be a little choppy with a low frame rate. Moreover, I also observed that my new smartphone has better image quality than my webcam. Thus, I now use my cellphone to record the video of myself separately rather than using my webcam. This has the advantages that video quality is not affected by the CPU usage of Camtasia anymore and that better image quality is also obtained due to the smartphone’s better camera. Then, after I recorded the video with my smartphone, I import the video in Camtasia and synchronize the video with the sound and the recorded presentation. By doing this the end result has better image quality but is also more fluid. If I had a more expensive camera, I could also use this in place of my smartphone.
Conclusion
In this blog post, I have provided some tips about how to record a research talk on a computer. Hope this has been interesting and will be useful!
If you have some comments or other complementary advices, please leave a comment below.
=
Philippe Fournier-Viger is a professor, data mining researcher and the founder of the SPMF data mining software, which includes more than 150 algorithms for pattern mining.